The guidance provided on this page is intended to help collection staff create and maintain a digital image archive of their artworks.
Contents
Photographing sculpture of different sizes
Planning your image archive
Filenames
Keeping consistent filenames of your artwork images is crucial to making sure they don't get lost or mixed up. Storing the filename against the artwork's record within your database of artworks (even if this is a simple spreadsheet) ensures that the right image is always matched to the right artwork.
At Art UK, we assign all images a filename based on structured code, making sure there are no spaces or special characters (we use underscores instead).
[Region mnemonic]_[Collection mnemonic]_[Accession number].jpg
Storing backups
It is recommended collections make several backups of image files (both RAW files and processed sets) and store these in separate locations.
Backups can be made using online services (which may have cost implications, depending on the size of your image archives), or can be offline backups.
Offline backups can be as simple as copying over the archive regularly (e.g. monthly) to a set of hard drives, which are then taken away to be stored in a separate location.
When choosing your image backups, consider your budget, the frequency the backup will need to be updated, staff time implications, as well as other risks.
The Digital Preservation Coalition website has helpful resources and guides.
Photography settings
File type
We recommend you save an archive of unedited RAW files (uncropped, uncompressed RGB .tif files), as well as your 'working files' – so smaller jpeg versions you might use for your database or website. Keep the different versions named identically using structured filenames to easily manage the different versions. You could even add a suffix, such as '_web'.
The RAW files should have colour temperature, tonal and straightening adjustments made prior to the jpeg file being produced.
If making aesthetic adjustments to images, such as dust removal, it is recommended these changes are made to jpeg files, post-production.
Avoid applying sharpening to either the RAW or jpeg file.
File size
We recommend each image should be shot so that on capture the file size is a minimum of 30 MB and after processing (e.g. cropping) the file size is between 18 MB and 36 MB. This is dependent on the shape of the artwork, but processed files in the region of 30 MB should allow for any printing.
Images should be saved and processed at 300 dpi (dots per inch).
Working with a photographer
If hiring a freelance photographer to take photographs of objects, consider the following:
- How will the photographer back up their work after each day's shooting? It is recommended they store backups at least one other independent and detached device that would remain functional if the primary device fails or is corrupted. On long-term projects, it could be agreed that it is the photographer's responsibility to keep several backup copies of unprocessed and processed images until they are notified by their employer that they are no longer required and can be deleted.
- Intellectual property rights regarding the images, established using a formal agreement. Does the photographer waive their rights to the images, or do they require a credit? Does the agreement cover other usages, such as social media or film, as well as the intended project?
- If producing photographs for printed material, could the photographer's screen settings and the print output be matched?
- Post-production expectations – for example, should the photographer provide a set of images with frames cropped out? Should all sculpture be shown on a uniform grey background?
Art UK provides photography of 2D and 3D artworks as a commercial service. If you would like more information about hiring Art UK's team of professional fine art photographers, do get in touch.
Photographic equipment
Professional art photographers usually have a range of useful equipment.
Necessary equipment
- Camera. This should be a DSLR or medium format camera with a minimum of 30MP sensor capable of shooting RAW
- Lenses. A range of focal length lenses are required to capture objects of differing sizes in a range of differing, and possibly challenging, environments
- Tripod
- Portable flash equipment with softbox
- Background support. A support with an extension to at least 3 metres is desirable
- Calumet or Colorama Storm Grey background roll (1.35 metres wide)
- QP grey card
- Table space or collapsible tables
Additional equipment
- Calumet or Colorama Storm Grey background roll (2.72 metres wide). This may be required for larger three-dimensional artworks
- Lighting boom. This may improve the photography of sculptural work
- 'A' clamps
- Stepladder
- Blackout material to prevent reflections or blocking out light
- Second background support for hanging blackout material
During photography
Before several objects are photographed, it is helpful to print off and cut out filename labels to include within the photograph itself. You could leave the label at the edge of the photograph, or take a shot including the label as well as without. This way, photographs have a visual 'label' within the actual image, which can be later cropped out, reducing the risk of photographs being linked to the wrong artwork later on.
A Kodak colour control patch can be used during photography and a grey scale may also be included.
It may be necessary sometimes to use a smaller slice of a colour control patch when photographing very small objects. In these cases, ensure that the white square of the colour patch is visible within the image.
Post-production work
Colour correction and contrast
The photographer is responsible for colour correction and density via levels, curves and colour balance tools, usually managed using software such as Adobe Photoshop.
Cropping and other processing work
The photographer is usually expected to do any required repair work in image editing software (such as removing flare). All images should be presented correctly rotated and left unsharpened.
The photographer may agree to crop out all frames and shadows that may occur from frames (this includes cropping out circular, oval and irregular-shaped frames).
Two-dimensional artworks
Beware of glare when photographing artworks that are behind protective glass, plastic or shiny varnish. Try moving a light source or blacking out windows or lights to avoid reflections.
Backgrounds
For artworks with an irregular shape, when stripping out canvasses that are principally white, the background colour chosen should be black. Where irregularly shaped canvasses are non-white they should be stripped out to a white or grey background.
Multi-panel works
Consider taking both individual photographs of multi-panel works as well as a photograph of the fully assembled work. You could add a suffix to the filenames to organise the different versions.
Three-dimensional artworks
Photography settings
Ensure an appropriate depth of field is used to cover the entire sculpture depth in view whilst maintaining an out-of-focus background.
We recommend using an ISO of 100 whenever possible.
Angles
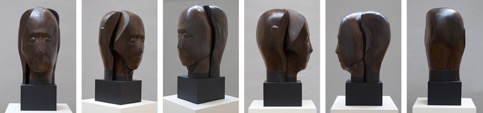
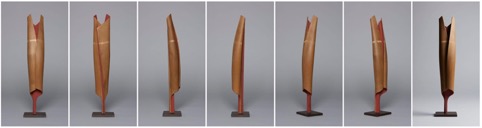
We recommend producing at least six main views of each sculpture: Front, Front left at 45°, Front right at 45°, Left side, Back, and Right side.
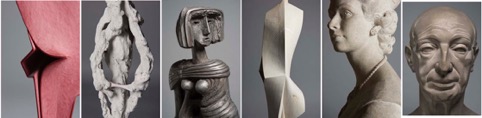
There could also be a detail shot of each sculpture, or a 'fun' shot, intended to demonstrate the texture and material of the sculpture and compliment the shape.
It may not always be possible to photograph all sides of an object if the sculpture cannot be moved, is up against a wall, or in a corner. In these circumstances, you should try to photograph the front of the sculpture and any other appropriate angle that is possible.

Image processing
Using a Calumet Storm grey background roll helps to white balance the image whilst the highlight and shadow pixel values of the image should not exceed 250 for the highlight and should not be lower than 5 for the shadow in Adobe RGB (1998).
![]()
For images without a grey background, a QP grey card should be used to set the white balance. This should not appear in the images but must be used for each setup and can be applied to all images captured under the same lighting and exposure setup.
Cropping
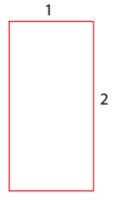
For the six main views, the images should be cropped with an even surround top/bottom, left/right.
When photographing thin objects, leave a bit of extra space for a more balanced image.
We recommend not going under a 1:2 ratio.
Photographing sculpture of different sizes
Desktop photography (sculpture that can be moved)
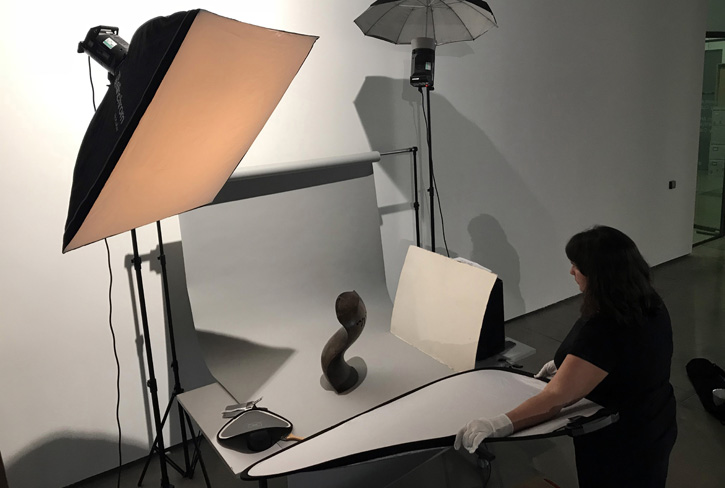
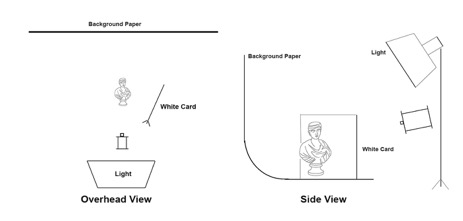
The aim of photography is to document the sculpture as accurately as possible. Therefore photographers should adopt a reasonably flat lighting scheme with enough modelling light to bring out the depth and detail of the sculpture.
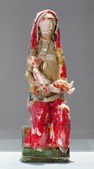
An example of a simple light setup is shown below:
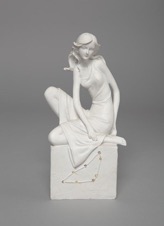
This produced the following result:
Photography of large indoor sculpture (that can be moved)
As with desktop photography, the intention is to document the sculpture as accurately as possible. Therefore you should adopt a reasonably flat lighting scheme with enough modelling light to bring out the depth and detail of the sculpture and if possible place the sculpture on a grey backdrop.
Photography of indoor sculpture (in situ)
When photographing large sculpture in situ it may not always be possible to photograph the main six views due to its position. In these situations, photograph the views you can get. You could make a note of the reasons for the reduced number of views.
Photography at York Art Gallery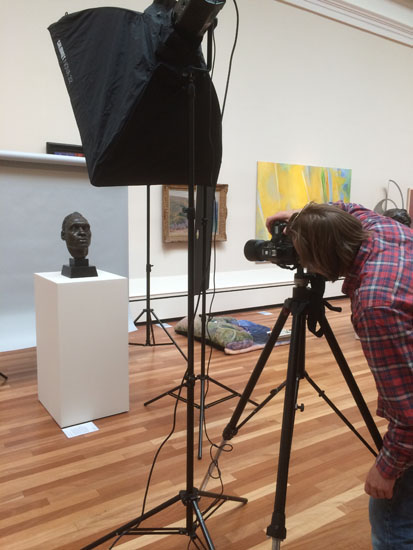
Although it may not always be possible you should try to put a grey backdrop behind the sculpture, as shown above.
It may also be appropriate to use the sculpture's gallery lighting instead of lighting it yourself, although you may need to use some fill-in lights for certain aspects, such as the back of the sculpture, as these tend not to be lit well when in position in a gallery.
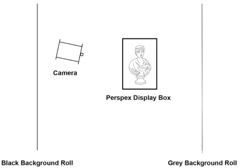
Photography of indoor sculpture (in situ, in display boxes)
Some sculptures on display are in display boxes. If the sculpture cannot be removed from the display box you will need to photograph the sculpture whilst trying to minimise any reflections. This is achieved by having a second background support and blackout material which can be hung behind the camera to minimise the reflections.
Photography of outdoor sculpture (in situ)
Photographing Kenny Hunter's 'Monument to a Mouse'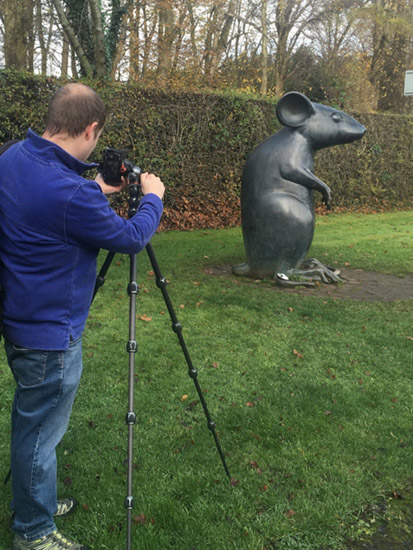
When photographing outdoor sculpture in situ it may not always be possible to photograph the main six views due to its position.
Photography of sculpture outdoors is best done in natural light. Bright hazy weather is the best light, but if it is a sunny day, photography would be best done at the beginning and end of the day when the light is softer.
Depending on the location of the sculpture, post-production work may include cutting out the sculpture and placing on a standardised background. However, some locations could be shown if they provide context to the sculpture image.
This page was produced using guidance produced by Colin White and Jessie Maucor, Art UK Photography Managers in June 2018.